Git Introduction
In our organization some of our code is stored in a Git repository and I created this document internally to help people understand Git better. So I thought it could be useful for others to use since I try to put the git system in the context that the commands were created (making them more logical for use and easier to remember). This document will explain the basics of the Git repo and how it is used.In addition to this document, one can review this excellent guide as well: Atlassian Git Guide
What is Git?
Git is a version control system that was original created by Linus Torvalds (Linux creator) to manage the Linux kernel source code. Its core principle is that it is a distributed source control system (meaning the code does not have to be stored in a central server). This allows for each developer contributing code to work entirely isolated and then later mesh those changes with other users in a consistent manner. Each developer has a full copy of the source control for the project on their machine. A program namedgit was created to perform the actions on the repository locally and the synchronize those changes with others.Git Basics
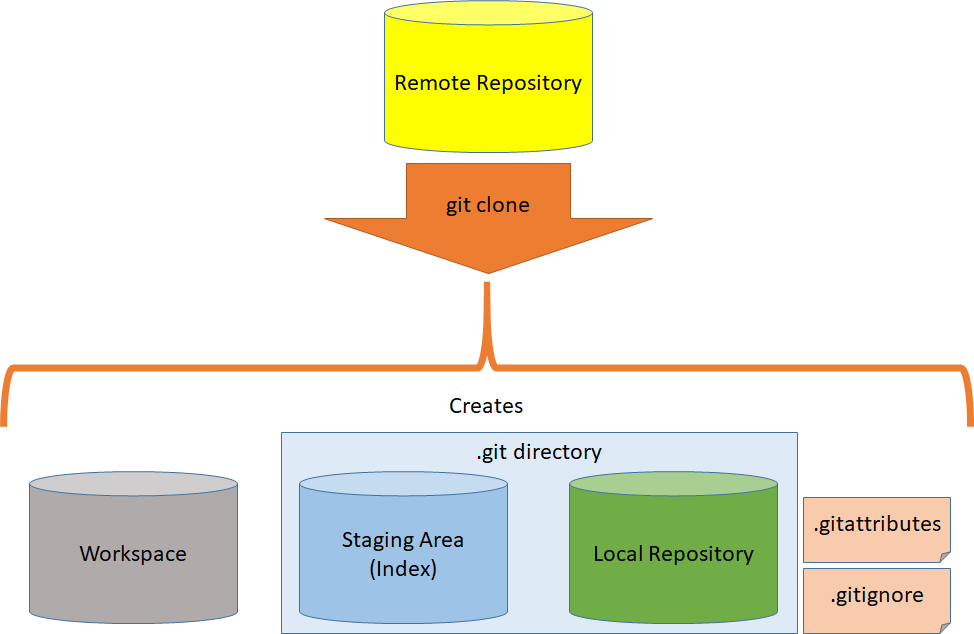
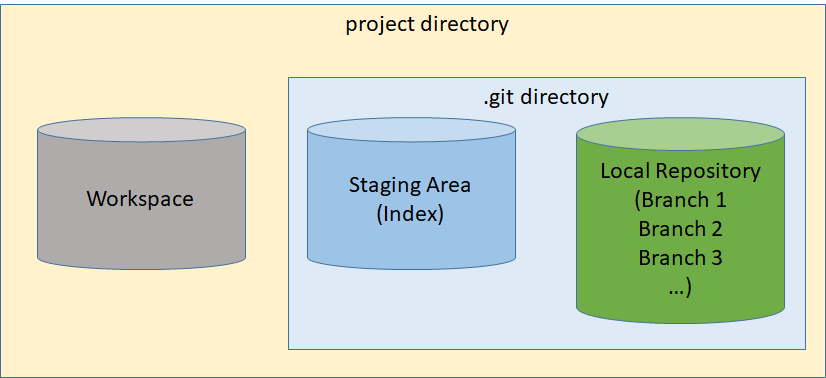
The entire git system on the development machine is contained the .git folder in the project directory, which contains two primary objects:- Repository
- Staging Area (or Index)
git program. Here is a representation of the physical layout of the git system: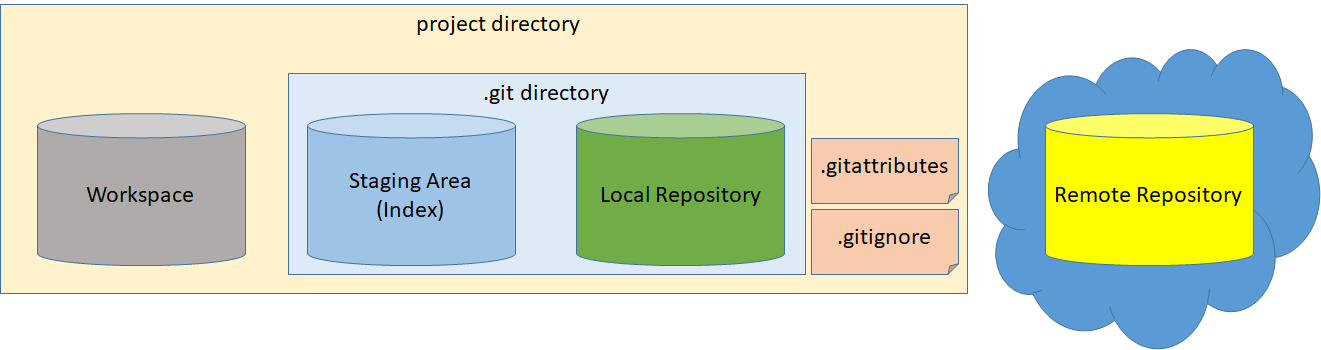
Components are:
- Project Directory - folder for the entire project
- Workspace - all the source code directories and files for the project
- .git Directory - container for the local git system and contains:
- Staging Area - index within the git repository that contains what changes you have made to the files in the workspace.
- Local Repository - compressed database containing all the files and their history.
- .gitattributes File - settings for the git repository for this project (i.e. line endings, default editors, etc.)
- .gitignore File - information about which files to ignore from source control (i.e. compiled output, user settings, etc.)
- Remote Repository - a remote copy of the project that others may use as a reference.
Local .Git Directory
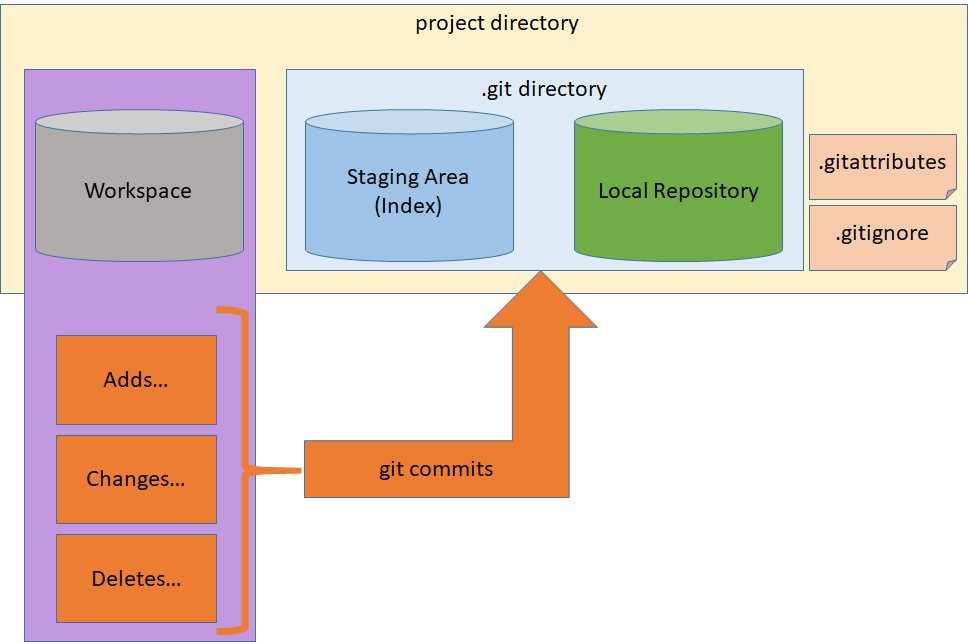
You can think of the local .git directory as the entire source control system. All changes, adds, and deletes are done in the workspace and managed in the local git repository usinggit commands.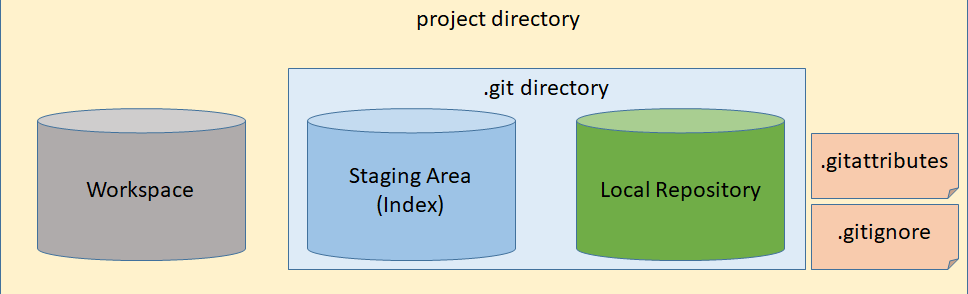
In a traditional source control system, there is a central server containing the source files and users checks out and checks in changes to that server. In git, that all occurs locally against your local git system (.git directory). Those changes can then be shared to a central location with which others can synchronize.
Remote Repository
The remote repository is nothing more than a copy of the local git system for others to use as a reference. It serves as a centralized sharing point for everyone to communicate their changes to the others.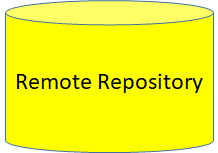
Developers make changes in their local projects, link those changes to their local git systems, then share those changes to the central reference copy known as the "remote repository". Others may pull down those changes to their local git system and mesh those changes with their own using
git commands.Using a Shared Project (Cloning)
After a project is initially created and shared to a network location, others may make a copy of the project to perform local development work. This process involves usinggit to copy and link the remote repository to their local project location and is done using the clone command:git clone This creates the local git system for the project and copies down the history and working files while being linked to the shared reference copy.
All developers who are linked to the same remote repository can now share their changes with the same centralized set of changes using
git commands.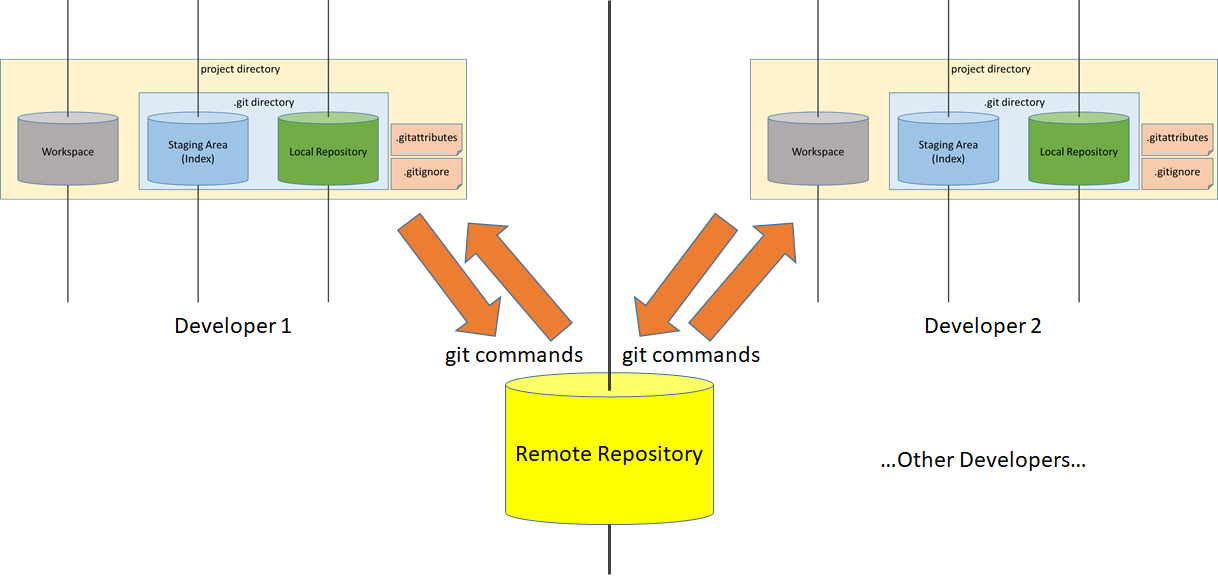
Working with Remote Repositories
There are several commands to synchronize your local project's git source control system with the shared reference copy. These commands allow for pushing of your changes to the shared reference copy and for merging of changes done by others with your own. Here is the basic diagram for these commands: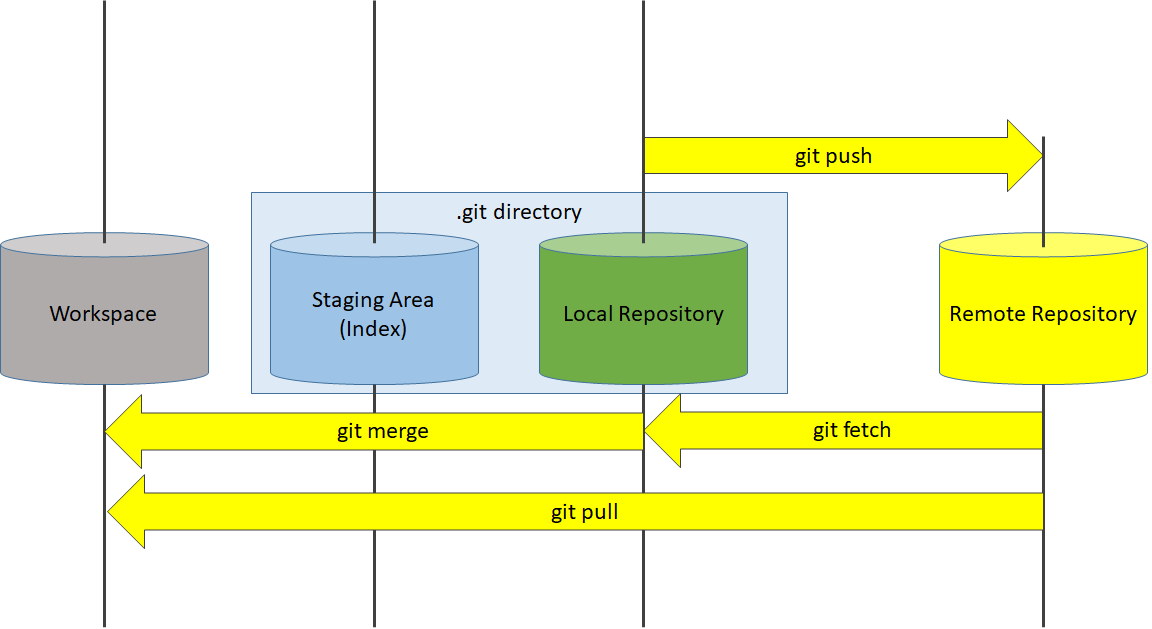
Common Remote Repository Commands:
- pushes changes make to your local repository (linked to a remote repository) to the remote.git push
- fetches the changes made by others into your local database without making changes to your working filesgit fetch
- merges changes in your local repository with your working files. Normally changes are meshed by git seamlessly unless two conflicting changes were made (known as a "merge conflict", which must be dealt with manually).git merge
- performs agit pull
andgit fetch
together.git merge
Working with Local Repositories
There are several commands to add your workspace changes to the local git source control system. At any point your changes can be undone by either overwriting your local repository with the remote reference, or by undoing changes you have committed to your local repository.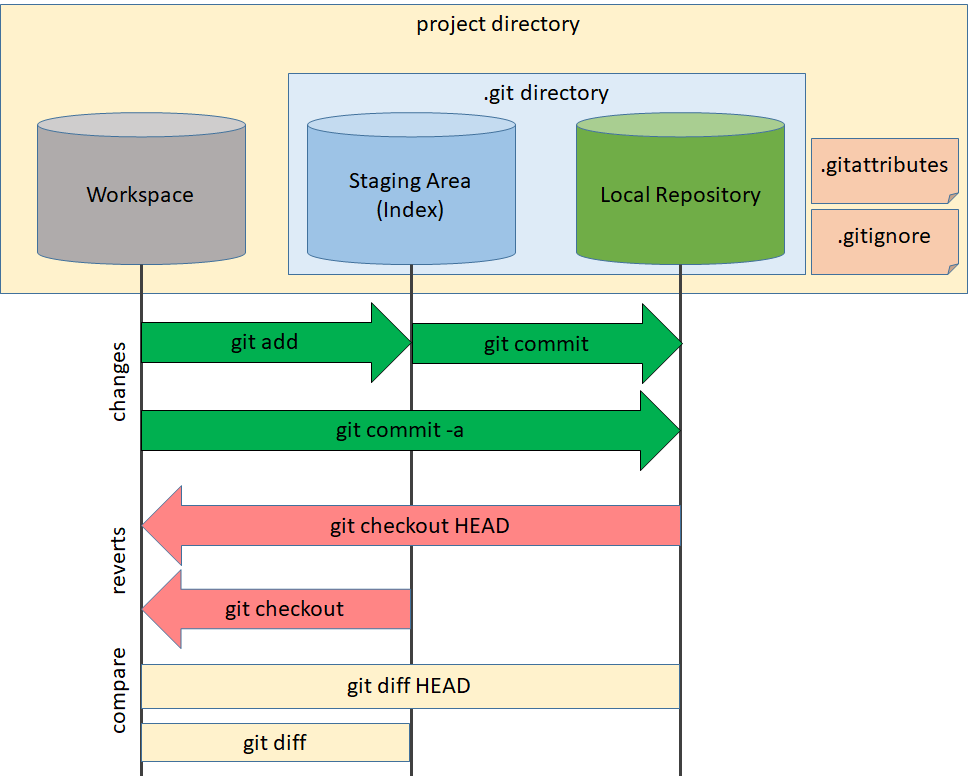
Git Branches
In addition to the history of the current files in the project, git can also manage changes to multiple branches of the same project, each with their own history and common ancestor.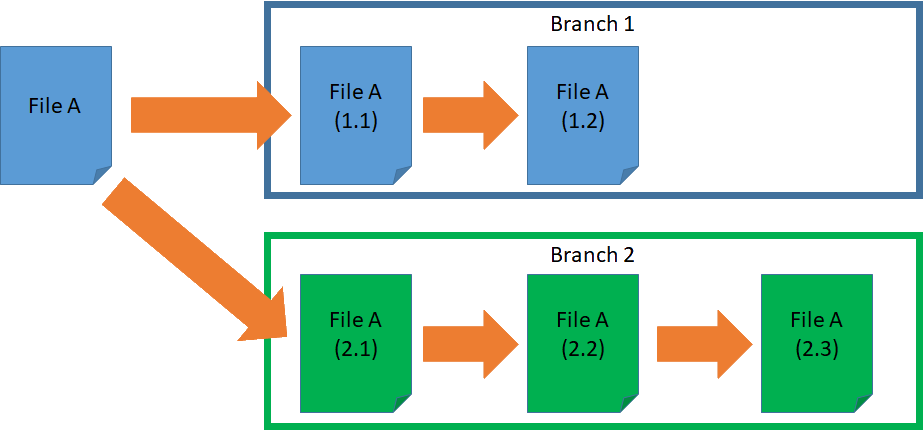
The history of all the branches is stored in the same local repository as before. This allows for distruptive development to occur in parallel with a separate copy of the files. In addition, it can encapsulate a series of changes in a visually separate stream in git visualization tools.
The git branch is not specific to a single file, but to the entire project. So there can be changes to any files within the project in the separate branch and they are all stored in the same repository.
The commands to view branches in your local repository are:
- lists all branches in your repository (same asgit branchgit branch --list)
- Creates a branch namedgit branch <branchname><branchname>(but does not switch the workspace to it)
- Deletes a branch namedgit branch -d <branchname><branchname>locally (note that if the branch exists in the reference remote repo, you need to dogit push origin --delete <branchname>in order to delete from the shared repo)
Working With Branches
The user may chose to work with any branch in their repository by switching the files in the workspace to the branch of their choosing, or creating a new branch.
Once you have switched branches, all changes made to the project are isolated to that branch and do not affect files in the other branches.
The commands to switch branches are:
- Switches the current workspace to the <branchname> branch and sets all edits to be on that branch.git checkout <branchname>
- Creates and switches to <branchname>. This is the same as runninggit checkout -b <branchname>
followed bygit branch <branchname>git checkout <branchname>
Feature Branch
Generally, unique features are developed in a separate "feature branch" to isolate multiple changes until the feature is ready to be brought back in the the standard branch. This allows for multiple advantages:- Breaking changes will not disrupt the main branch.
- Multiple changes can be made slowly over time and tested independently of the main branches changes.
- Multiple feature commits can be compressed into a single commit on the main branch.
git checkout -b coolfeatureThen they would push the feature branch to the shared repo if others are working it too (so that everyone is working on the feature in the same branch):
git push -u origin coolfeaturegit push -u origin HEAD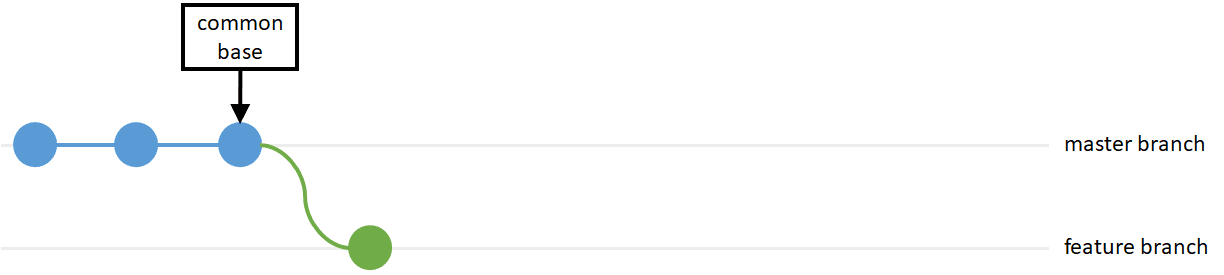
Next, changes may occur on either the source branch or the feature branch independently. The feature branch can be shared in the remote repository or it can be isolated to a single users workspace.
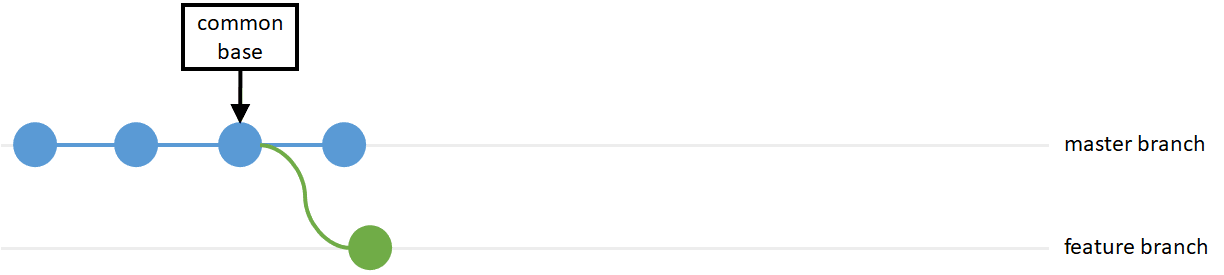 Master branch developers would be performing these commands while making changes:
Dev A:
git pull,git add .,git commit,git push
Dev B:
git pull,git add .,git commit,git push
...
Feature branch developers would be performing these commands:
git checkout coolfeature...
git pull,git add .,git commit,git push
git pull,git add .,git commit,git push
...
Once all work has been completed on the feature branch, it is ready to bring back into the master branch. Each of the branch 'tips' will be merged into a single branch.
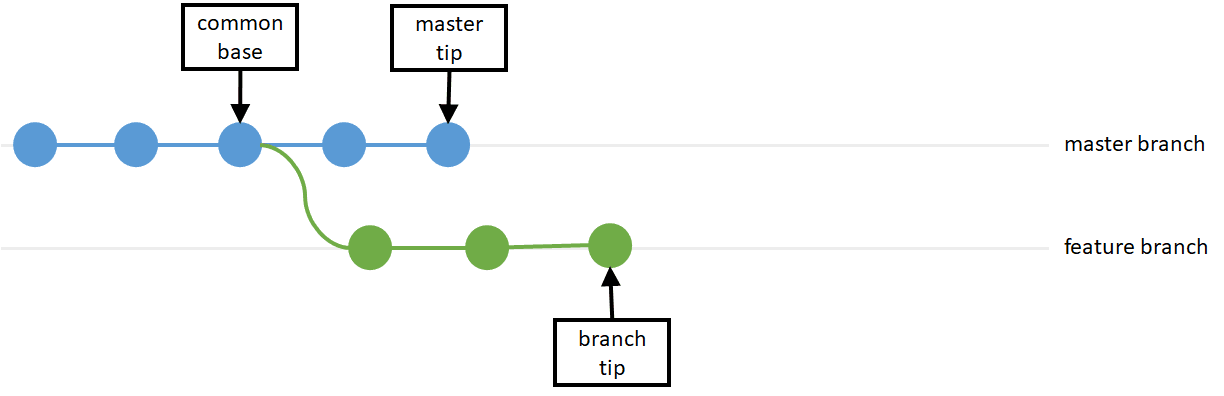
A merge occurs that combines the two branch tips together in a single commit on the branch where the integration occurs.
Using the merge command:
git checkout mastergit merge coolfeature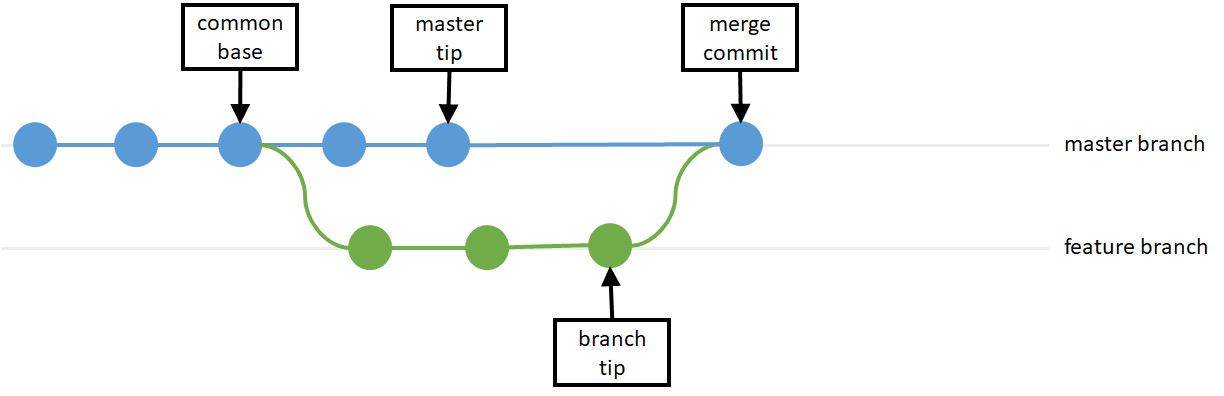
This merge represents the simplest flow, but much more complicated branching can occur.
Additional Advanced Topics
Initial Creation of a Git Enabled Project
*WARNING: This section is only done ONCE by the project creator during project creation!*In order for others to contribute to the same project, the project creator performs two steps:
- Create a local git system to handle source control for a project.
- Share that local git system with others to synchronize.
git init
This take all files and folders in the current directory and creates a .git directory with the necessary git database and other components.
The project repository can be shared to a web/network location for others to to use a reference for cloning and synchronizing their changes. The commands to create the shared reference copy of the project are:
// Add changes to a commit
git add .

// Save the commit in the local repository
git commit -m 'initial commit comment'

// Add a remote repo with name "origin" (like clone would do if you were pulling it down)
git remote add origin <url location of shared repo>

// push your repository to the master branch
git push -p origin master
At this point the reference copy of the repository is available for others to clone and to submit changes.